

Getting someone to watch a demo video all the way through feels like winning. It’s actually where most of the value gets lost, in the few seconds right after the last frame.
The pitch lands. The point gets made. Then the video just ends, and the cursor sits there with nowhere obvious to go. Most people close the tab.
Nothing on screen gave them a reason to stay, or a place to click if they wanted to. A pasted embed can’t pause on that moment. It can’t ask for anything. It just keeps playing until it stops.
FluentPlayer can hold that exact second, put a message in front of it, and send the viewer somewhere on purpose. This guide covers how to build that CTA layer, plus a full example that changes the message depending on who’s watching.
TL;DR
- FluentPlayer’s CTA layer is a Pro feature that pauses the video and shows a click-through message at a timestamp you set.
- Text & Button Overlays, also Pro, do a lighter version of the same job without pausing playback.
- Both layer types support Conditions, so a first-time viewer and a known FluentCRM contact can see different messages.
- Completion Type controls what counts as “done”: a link click, an auto-dismiss timer, or a manual skip.
- A CTA click tells you a viewer engaged past that point in the video and cared enough to act. It does not tell you they are ready to buy.
How to Add a CTA to a Video in WordPress
In FluentPlayer, you add a video CTA by opening a media item’s Interactive Layers panel, adding a CTA layer, and setting a timestamp, a message, and a button link; playback pauses at that point until the viewer clicks through or skips.
The path: Media → open a video → Interactive Layers → + Add Layer → CTA → Display, Content, Controls, Appearance, Conditions → Add Layer → Save on the media item.
Where the CTA Layer Fits Among the Six Layer Types
CTA is one of six interactive layer types FluentPlayer offers: Forms, Email Capture, CTA, Hotspot, Shortcode, and Ad. Forms and Email Capture ship free. The other four, including CTA, are Pro. The free vs. Pro feature breakdown lists the full split if you want to check a specific feature before you build.
What a CTA Click Can and Cannot Tell You
A click on the CTA button tells you the viewer watched till that exact timestamp and chose to act on what they saw. It’s a real, specific engagement signal tied to one moment in one video. It does not tell you why they clicked, whether they can afford the offer, or whether they intend to follow through.
Do not treat a CTA click as a buyer-intent score. It is evidence of engagement with this video at this point, nothing more. Route the click to a tag that says what happened (clicked-cta), not a tag that claims what it means (hot-lead). Let a human, or a later action like a purchase, decide readiness.
The Complete Workflow, Before Any Settings
Before opening a single panel, here is the full sequence a CTA layer runs through:
- A viewer starts the video and watches toward your chosen timestamp.
- Playback hits the Start Time and pauses.
- The CTA content you built appears on top of the frame.
- Conditions, if you set any, decide whether this viewer sees this version of the CTA at all.
- The viewer clicks your button, clicks Skip, or waits out the Auto Dismiss timer, depending on your Completion Type.
- Playback resumes once the layer is marked complete.
- If the button links to a form or signup page tied to FluentCRM, the click and any resulting submission become data you can act on later.
What You Need Before You Build
- FluentPlayer Pro active. The Interactive Layers panel only shows Fluent Forms and Email Capture on the free plugin; CTA, Hotspot, Ad, and Shortcode tabs appear once Pro is active.
- The video is already uploaded to Media, with a runtime you know, so you can pick a real timestamp instead of guessing.
- Your CTA copy and destination link should be decided before you open the editor. The content editor has no separate headline or button fields, so plan the heading, the line under it, and the button text as a set.
- If you plan to segment the CTA, your FluentCRM tag is named and confirmed before you start, not invented on the fly inside the Conditions panel.
- A habit of clicking Save on the media item after adding a layer. A layer added but not saved will not appear on the live player, and nothing warns you at the time.
If you’re setting up FluentPlayer for the first time, the free plugin on WordPress.org gets you the player, the Forms layer, and the Email Capture layer with no Pro license required. It’s enough to run in-video lead capture today; the CTA layer below is what Pro adds on top.
Step-by-Step: Add a CTA Layer to Your Video
Open the layer editor
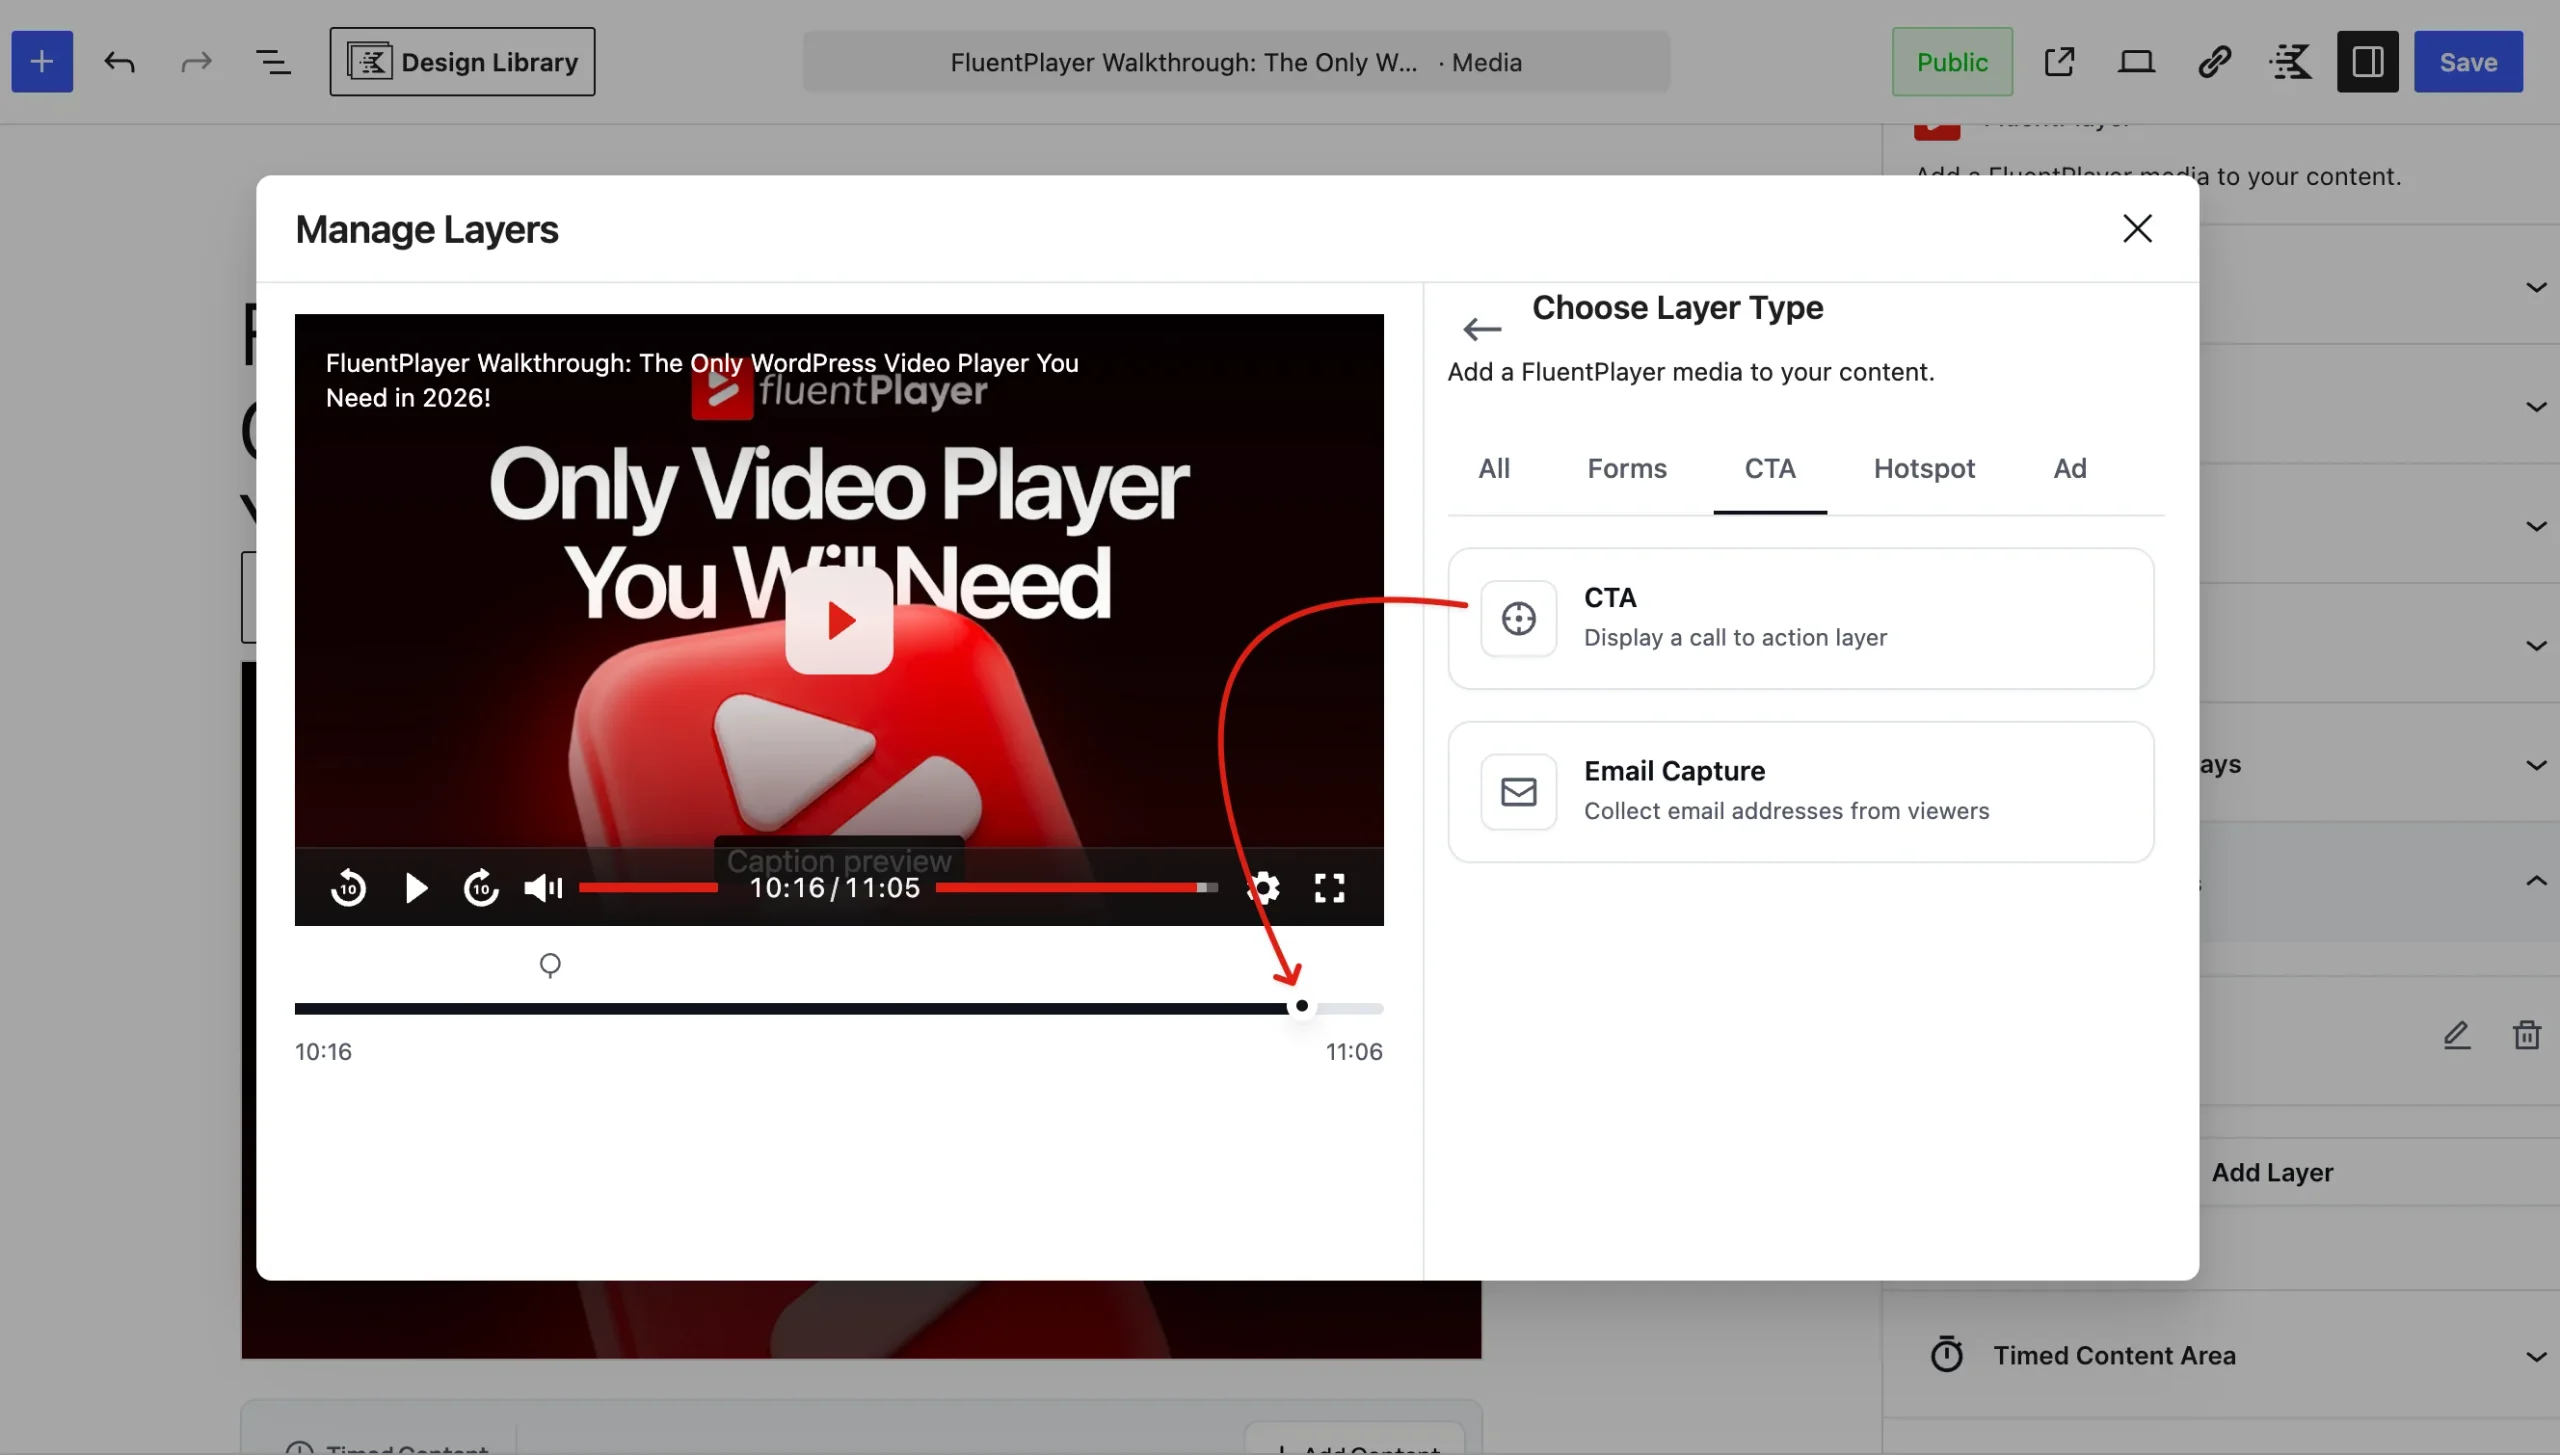
Go to FluentPlayer → Media, open the video, and expand Interactive Layers in the right sidebar. Click + Add Layer, then choose CTA from the layer type tabs (All, Forms, CTA, Hotspot, Ad, Shortcodes).
Set the Display timing
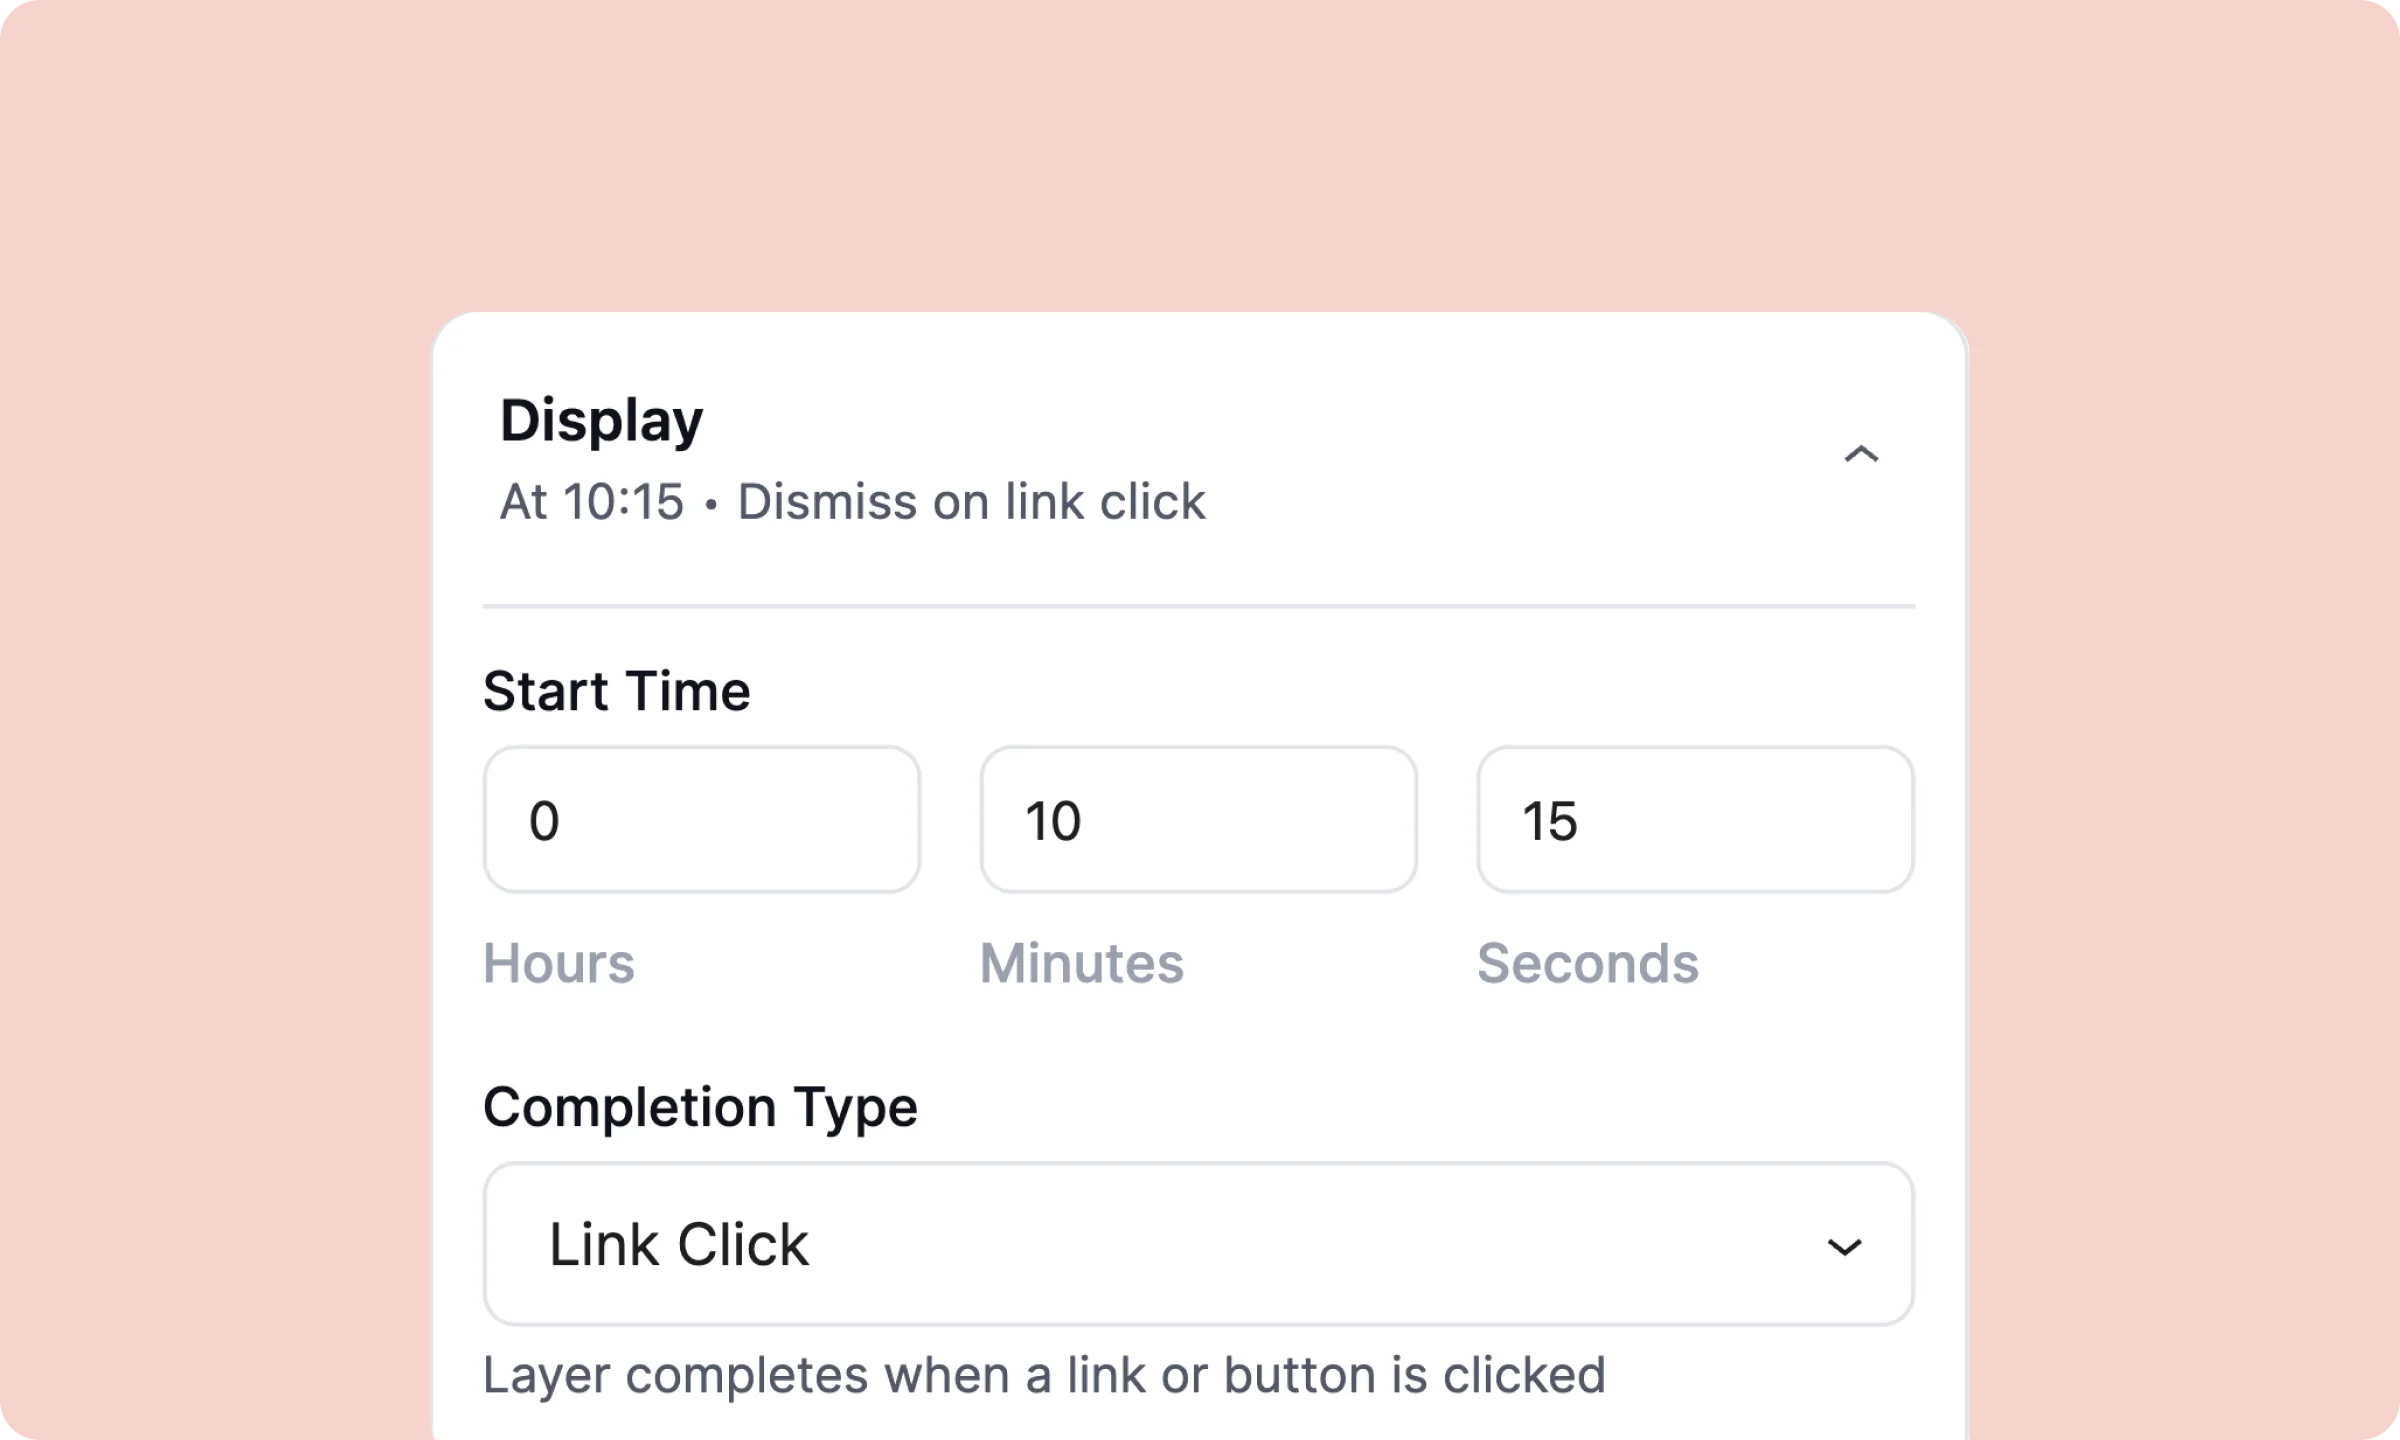
Enter the Start Time in hours, minutes, and seconds. Then choose a Completion Type:
| Completion Type | What happens |
| Link Click | Layer completes when the viewer clicks a link or button inside it. Default, and the right choice for most real CTAs. |
| Auto Dismiss | Layer disappears on its own after a set duration, no click required. |
| Skip Only | Layer stays until the viewer manually clicks Skip. |
Do not pair Link Click with Allow Skip turned off unless you mean to gate the video on that click. With Skip off and Completion Type set to Link Click, a viewer who has no interest in your offer has no way to resume the video. That is sometimes exactly what you want for a required step. It is a bad default for a soft nudge.
Write the Content
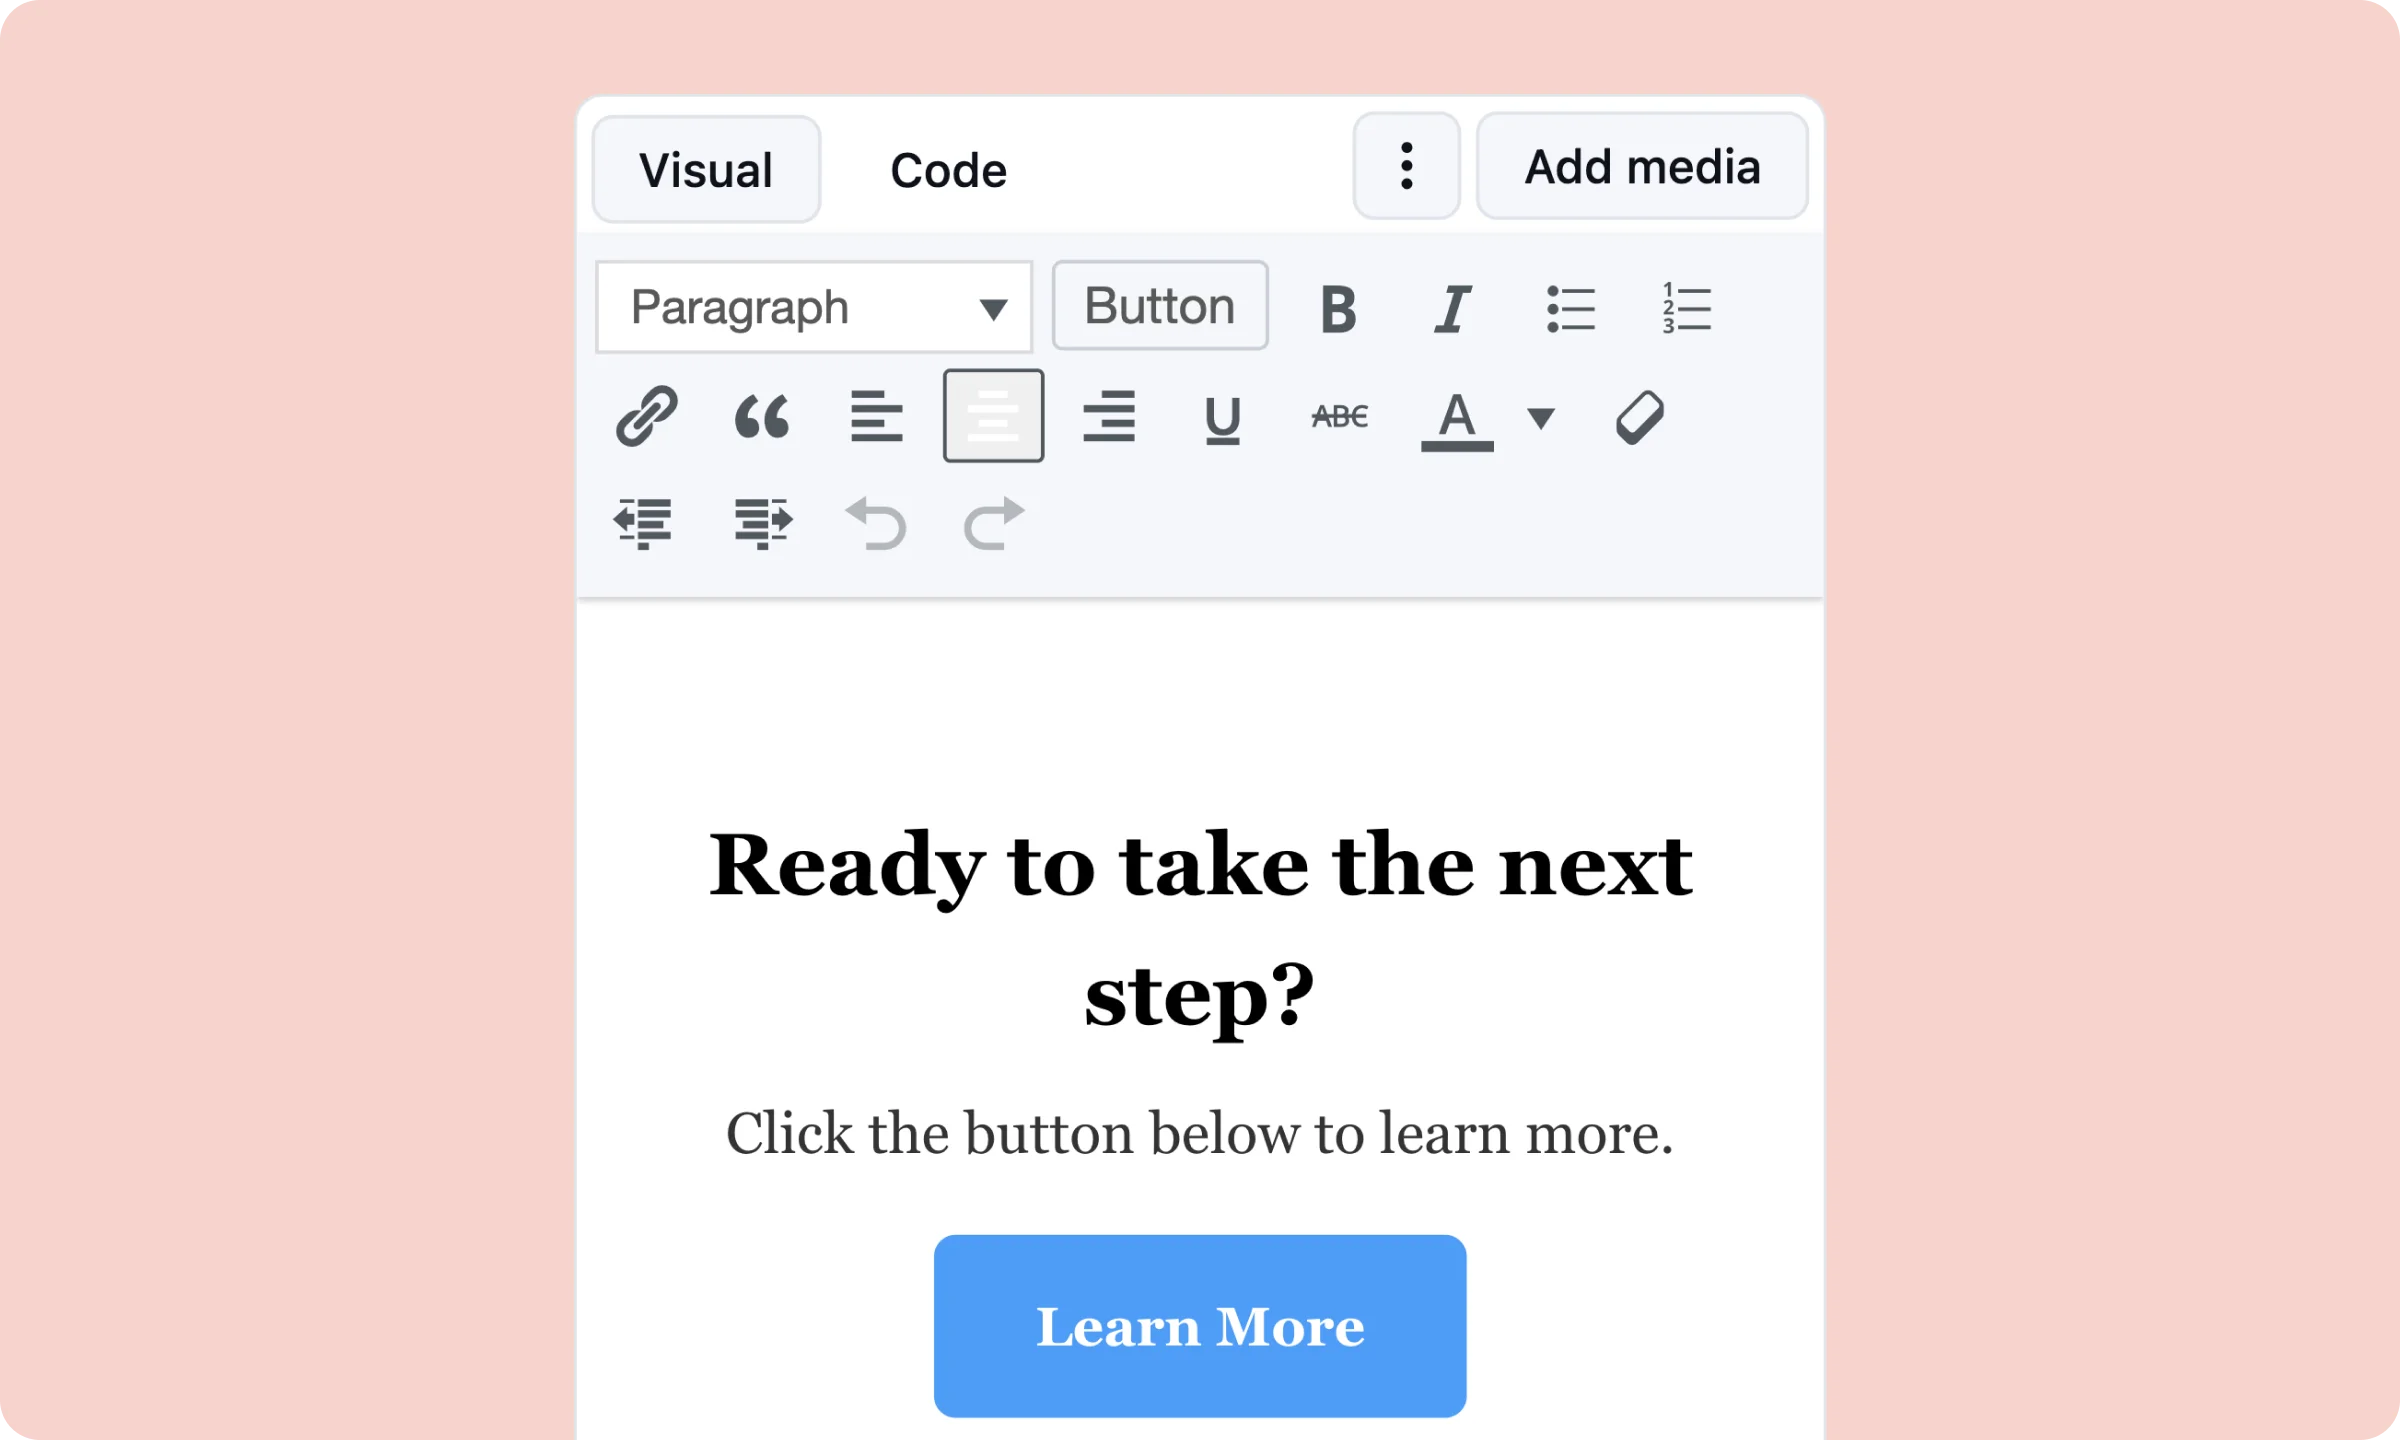
The Content section is a rich text editor, the same one you use for WordPress posts. There are no separate headline or button fields. Use the toolbar’s Heading and Button tools to structure a short message: one heading, one line of supporting text, one button.
Set Controls and Appearance
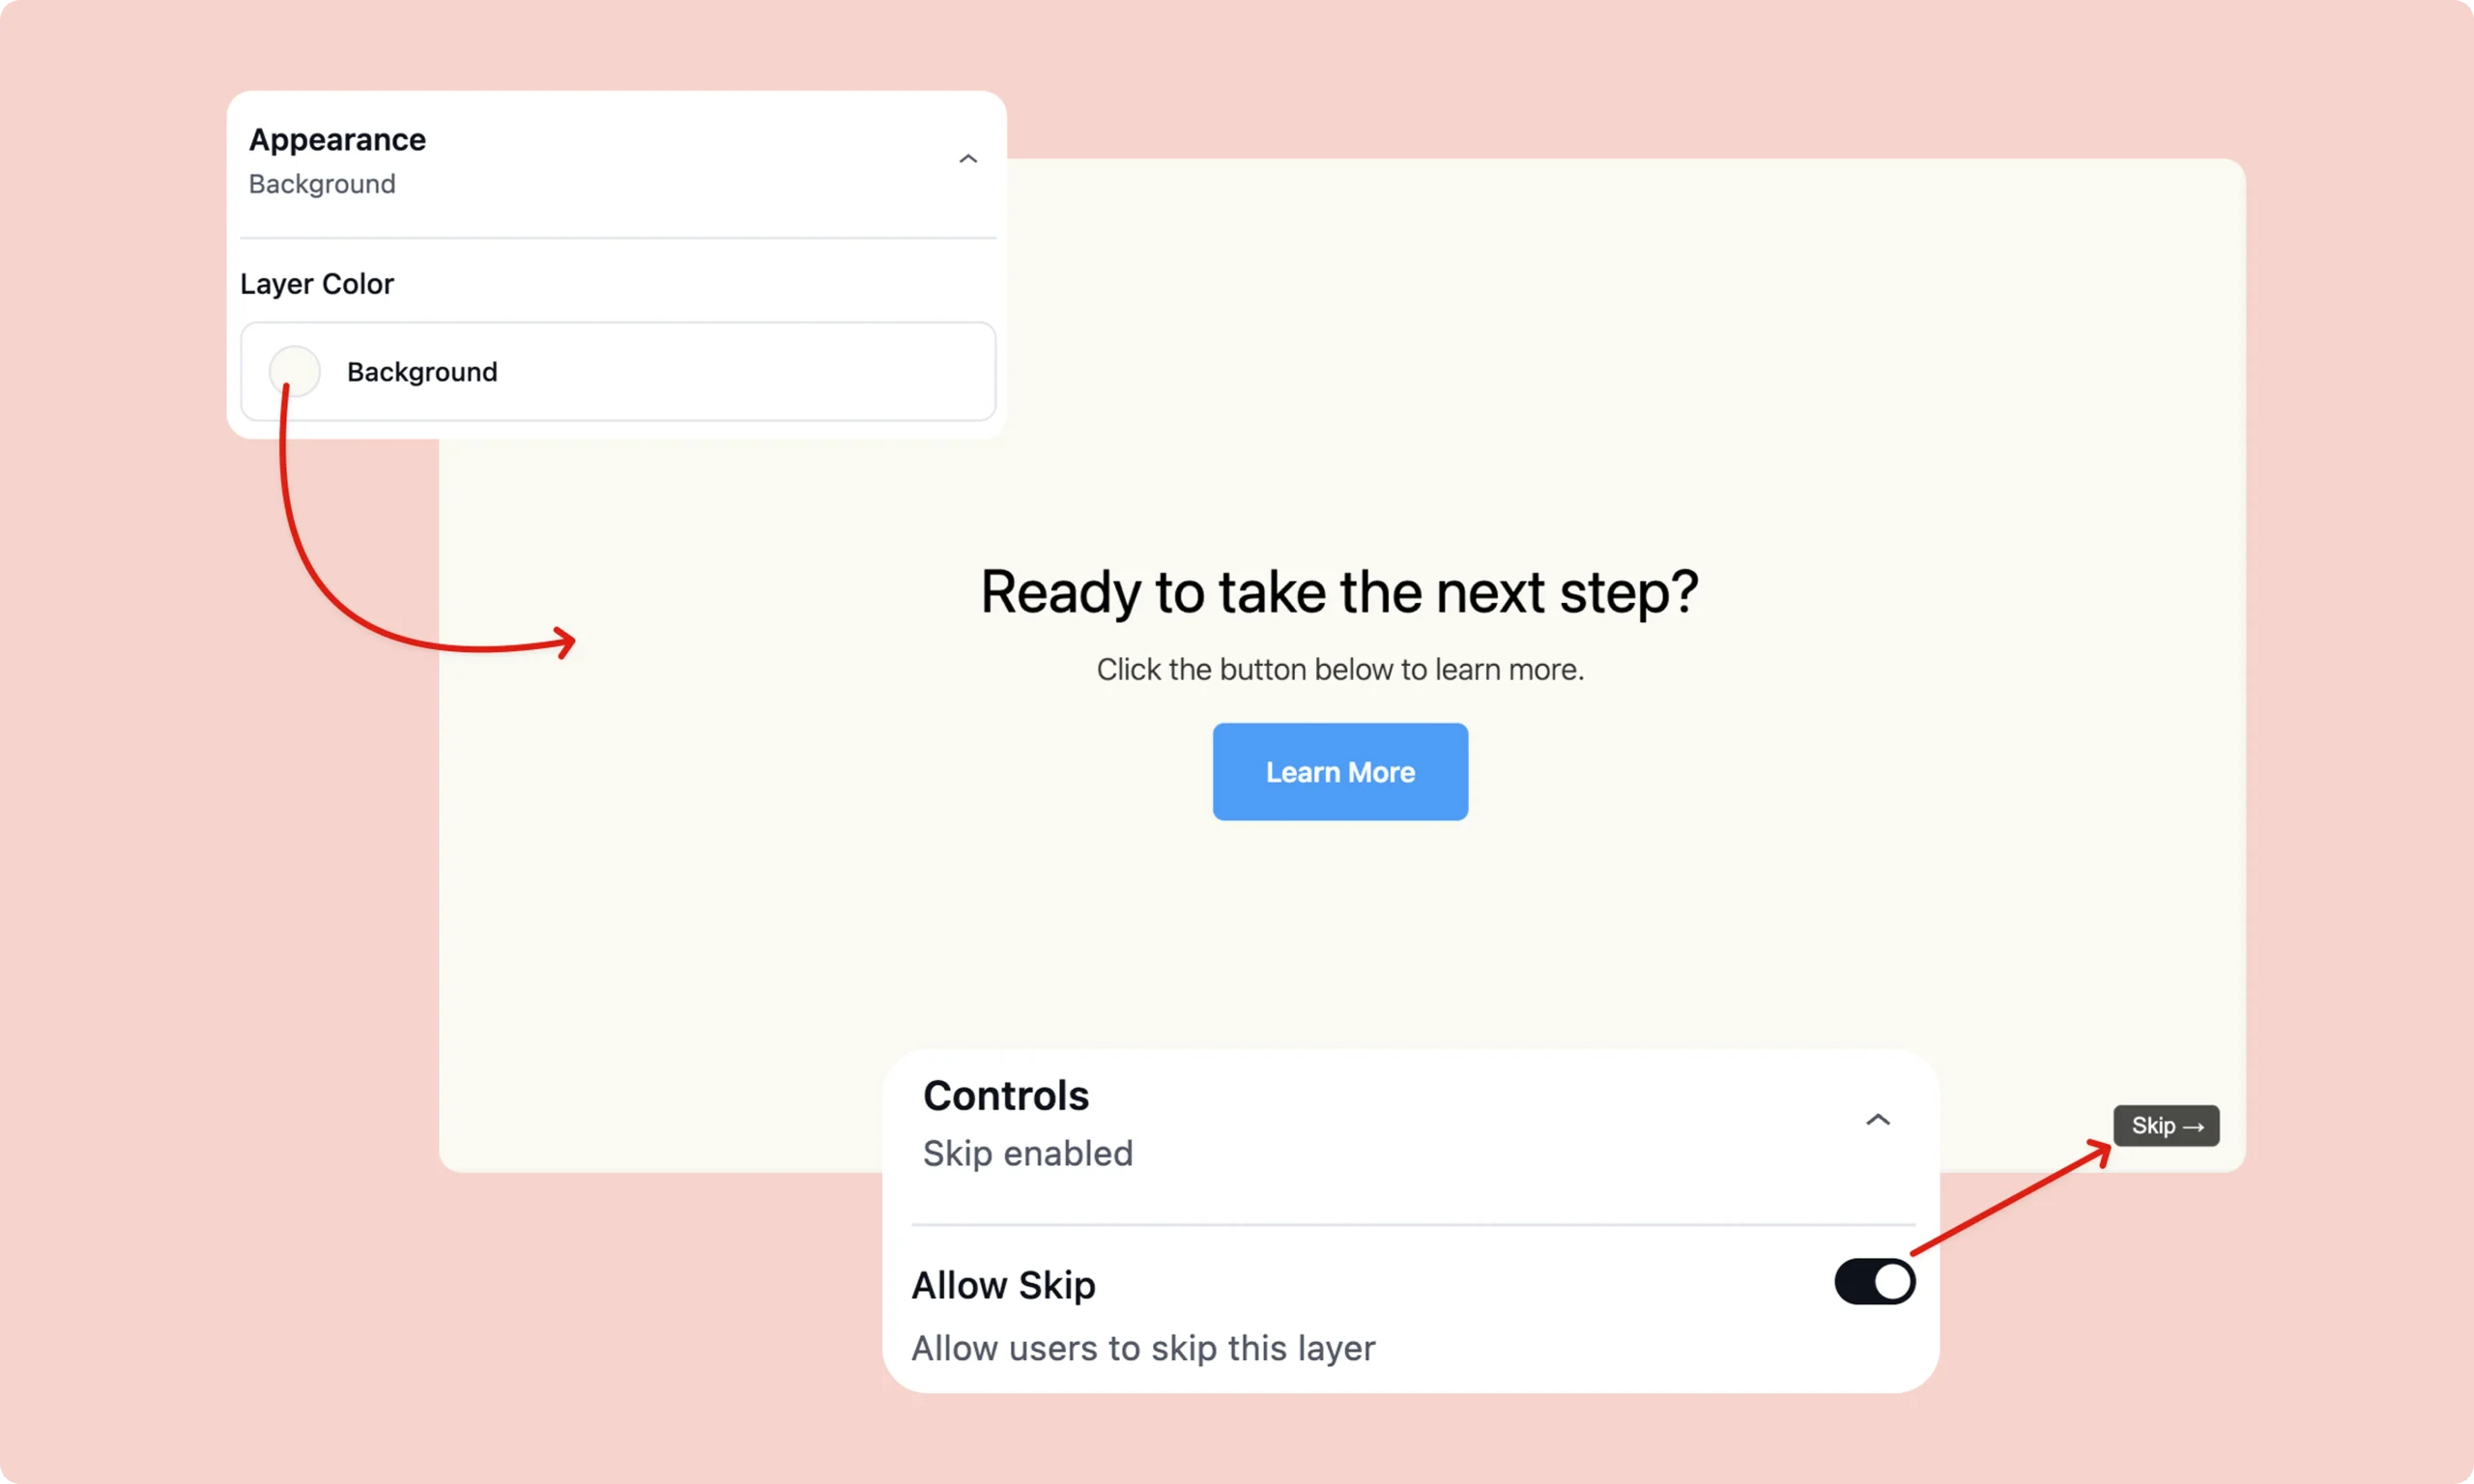
Toggle Allow Skip based on the gating decision above. In Appearance, set the Layer Color background so your text reads clearly against the paused video frame behind it, most often a semi-transparent dark background under light text.
Add Conditions if the CTA should vary by viewer
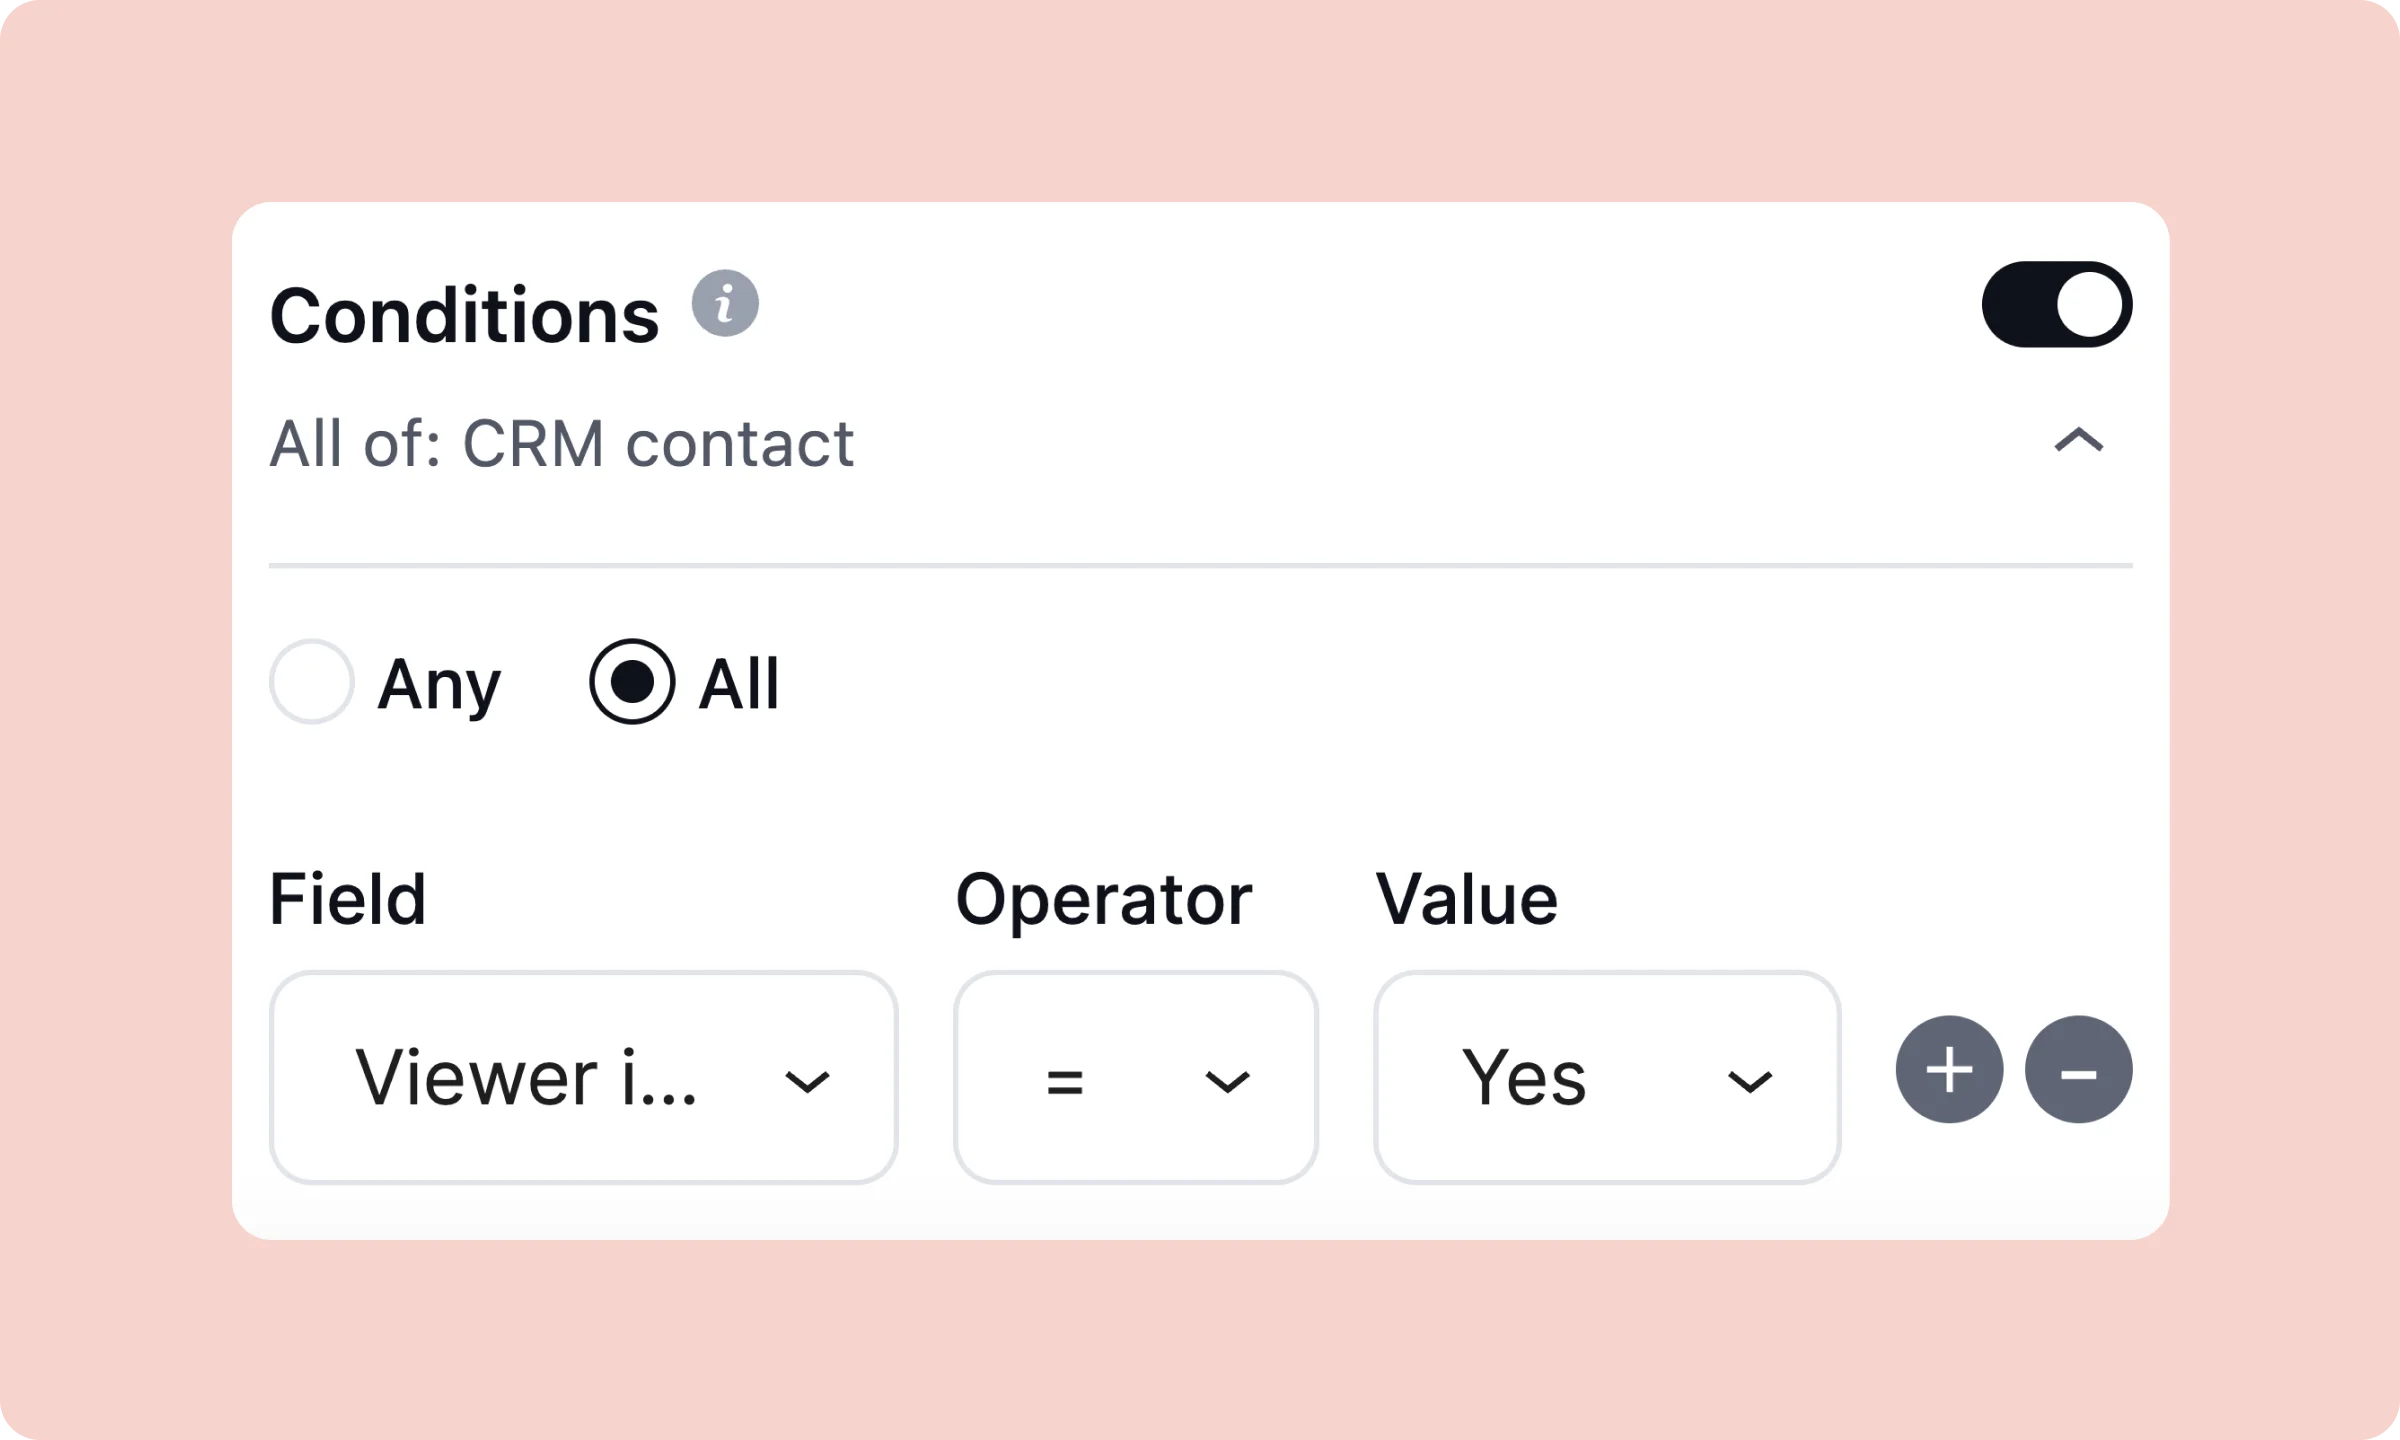
Toggle Conditions on, choose Any or All, then build rows from Field, Operator, and Value. Available fields include viewer login status, FluentCRM contact match, FluentCRM tag, and URL query parameters. The next section walks through a full segmented example.
Click Add Layer, then Save the media item.
Segment the CTA by Who’s Watching
This example extends the two setups in FluentPlayer’s own CTA documentation. A 17-minute product demo video ends with a CTA layer at the 15-minute mark: heading “Like what you see?”, text “Start your free trial today.”, button “Get Started” linking to the signup page. On its own, that version works for a first launch. Once FluentCRM is connected, Conditions let the same timestamp show three different things depending on who’s watching.
| Viewer | Condition | What they see |
| Anonymous, no FluentCRM match | No condition, or “Viewer is CRM contact: No” | The default CTA: “Like what you see? Start your free trial today.” |
| Known contact, tag trial-started-demoq3 not present | “Viewer has CRM tag” set to not-equal trial-started-demoq3 | Same CTA, unchanged. They haven’t converted yet. |
| Known contact, tag trial-started-demoq3 present | “Viewer has CRM tag” set to equal trial-started-demoq3 | Layer suppressed, or swapped for a second CTA layer pointing to onboarding instead of signup. |
Namespace the tag to this specific video and offer, trial-started-demoq3 rather than a generic trial-started, so a trial that began somewhere else on your site doesn’t silently suppress this CTA too. Keep the tag exclusive to this trigger. If you reuse it elsewhere, this table stops meaning what it says.
Do not build the third row as a second full CTA layer with an overlapping Start Time. Two layers set to fire at the same timestamp with conflicting Conditions can both evaluate true for edge-case contacts and stack on top of each other. Give each layer its own Condition set that is mutually exclusive with the others at that timestamp.
What Each Version of the CTA Should Say
Anonymous viewer
Keep the ask simple and low-commitment. “Start your free trial today” beats a longer pitch. They haven’t given you anything yet, so don’t ask for much back.
Known contact, not yet converted
You can reference that this isn’t their first visit without sounding like you’re tracking them. “Ready to try it yourself?” reads warmer than a repeat of the anonymous version.
Known contact, already converted
Never repeat the trial pitch. Point them at the next real step, a setup guide, a booking link, a feature they haven’t used, instead of asking them to do something they already did.
Test It Before You Publish
Run three separate passes with distinct sessions, not one session reused three times:
Anonymous pass
Use a private browser window with no FluentCRM cookie. Watch to the trigger timestamp. Confirm the default CTA appears, the button link resolves to the correct page, and playback resumes after the click.
Known, not-converted pass
Use a test contact in FluentCRM without the trial-started-demoq3 tag. Confirm the second CTA variant (or the same one, if that’s your setup) fires correctly.
Known, converted pass
Tag a test contact with trial-started-demoq3 first, then watch. Confirm the trial CTA is suppressed or replaced, and confirm the video does not pause on a layer that shouldn’t fire.
Edge cases to check: A viewer who rewinds past the trigger point and hits it a second time, a viewer on mobile where the paused CTA layer needs to stay readable at a smaller size, and a media item where the layer was added but the page was never saved. Confirm the Pro license is active before you screenshot anything for publishing; an expired license quietly drops the CTA tab back to Forms and Email Capture only.
Measure Whether the CTA Is Working
Define click-through rate as CTA clicks divided by the number of viewers who actually reached the trigger timestamp, not total plays. A video with heavy early drop-off will always show a misleadingly low rate if you measure against total views instead.
Treat your first week of data as a check for obvious problems, not proof the setup works. A handful of clicks either way is not a result. When you do test a change, change the message or the timestamp, not both at once, so the next number you see actually tells you something.
CTA Layer vs. Text and Button Overlay: When to Use Each
A CTA layer and a Text and Button Overlay solve different problems. If your message needs the viewer’s full attention and a real decision, the CTA layer’s pause-and-prompt behavior is worth the interruption. If you just want a persistent, non-blocking nudge, like a subscribe reminder that floats in a corner, Text and Button Overlays do that without breaking playback. Full field-by-field detail on both lives in FluentPlayer’s Interactive Layers documentation, and the FluentCRM integration page covers how a CTA click, form submission, or tag flows into your contact record once Conditions are in play.
Your video already earns the watch time. The CTA layer is what turns that watch time into a click you can actually measure, right at the moment the viewer is paying the most attention. See FluentPlayer Pro plans to add CTA layers, Conditions, and the rest of the Pro layer types to your player.
Frequently Asked Questions
Does the free version of FluentPlayer include CTA layers?
No. The free plugin includes the Forms layer and the Email Capture layer inside Interactive Layers. CTA, Hotspot, Ad, and Shortcode layers all require FluentPlayer Pro.
Does a CTA layer slow down my page?
The layer itself only renders when the video reaches the trigger timestamp, so it adds no load-time cost beyond the player script FluentPlayer already loads for that video.
Can I show a different CTA to a returning FluentCRM contact?
Yes. Set Conditions on the CTA layer using Field, Operator, and Value, with options that include whether the viewer matches a FluentCRM contact and whether they carry a specific tag.
What’s the difference between a CTA layer and a Text and Button Overlay?
A CTA layer pauses the video and requires the viewer to click through or skip. A Text and Button Overlay displays a timed message or button without pausing playback, for a lighter nudge.
Where should I place my first video CTA?
Start at a moment tied to real content, right after you’ve shown the specific benefit you want them to act on, rather than a fixed percentage of runtime. The docs’ own example places one near the end of a 17-minute demo, right after the core benefit is shown.