You’ve probably spent hours scripting, recording, and editing videos for your site. But here’s the thing: if your videos just play from start to finish with no interaction, no moment where you invite viewers to take action, they’re basically expensive decorations.
Video consistently outperforms other content formats in engagement and conversion. However, most WordPress sites simply embed videos, hit publish, and hope for the best. There’s no capture mechanism, no connection between “someone watched my video” and “someone joined my list.”
In this guide, I’ll walk you through how to change that. You’ll learn how to turn WordPress videos into active lead generation tools, using email gates, embedded forms, interactive CTAs, and clickable hotspots, without writing code. We’ll be using FluentPlayer throughout, a WordPress video player designed with exactly this problem in mind.
TL;DR
- FluentPlayer adds interactive layers directly inside your WordPress videos, email opt-in, forms, CTAs, hotspots, ads, and shortcodes.
- You control exactly when each layer appears, so you capture leads at the moment viewers are most engaged.
- FluentPlayer works with YouTube, Vimeo, Bunny Stream, and self-hosted video, with no platform switching required.
- Fluent Forms and FluentCRM connect natively, so leads flow straight into your workflows without Zapier.
Why FluentPlayer
FluentPlayer is native to WordPress and works with video sources you’re probably already using (YouTube, Vimeo, Bunny Stream, or self-hosted files). It allows you to customize your videos with branding, preset styles, controls, chapters, and more.
Instead of hoping a viewer clicks a link in the description, you can add interactive layers directly on top of any video. You place the forms, CTAs, email gates, hotspots, and ads at the exact timestamp you choose, right where your viewer’s attention is sharpest.
The best part is that it connects naturally with WordPress plugins. Fluent Forms submissions flow directly into your workflows. FluentCRM can automatically tag and segment leads based on your video configuration. You don’t need any Zapier connection or extra tools, and your workflow stays neat and simple.
Now let’s see how you can capture leads with WordPress videos using this next-generation video player.
6 ways to capture leads with WordPress videos
Here’s a breakdown of each lead capture method FluentPlayer supports. You don’t need to use all of them at once, but understanding what each one does will help you pick the right approach for your specific situation.
Add a CTA layer
CTA layers are the simplest and most versatile option. They display a clickable button overlay at any point during the video.
You can customize the headline, description, button text and color, the destination URL, whether it opens in a new tab, and whether viewers can skip it. The trigger can be set at a specific timestamp during a video.
A few practical use cases:
- Send viewers to a landing page after they’ve seen your full pitch
- Invite them into a private community or membership at the moment they’re most impressed
- Promote a limited-time offer mid-video when attention and trust are at their highest
- Drive social follows when viewers are feeling most connected to your content
Use email gates
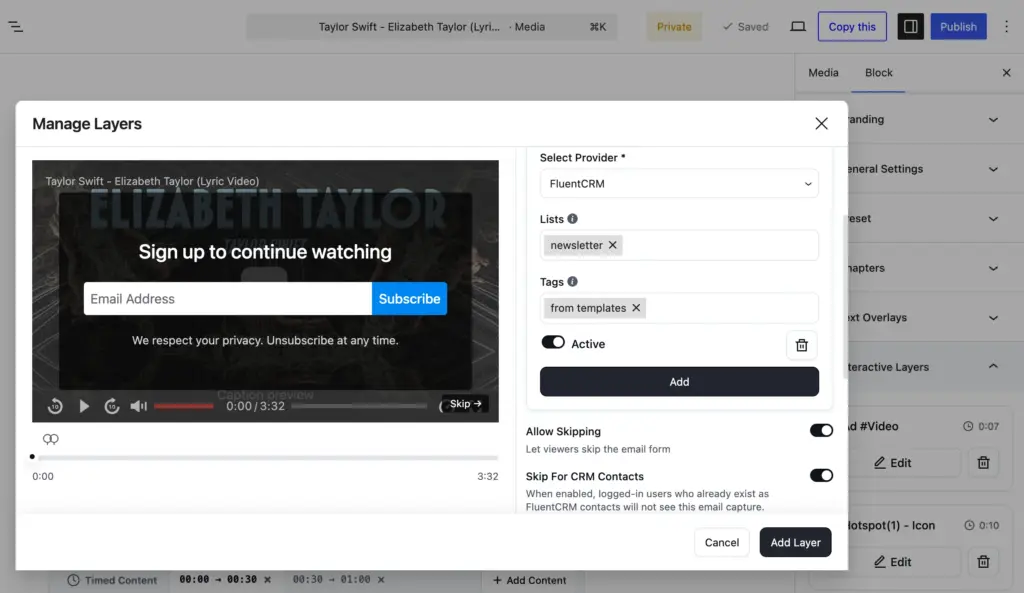
A video gate locks part of your video behind an opt-in form. Viewers enter their email to keep watching.
It works remarkably well when the content behind the gate is genuinely valuable, and the gate is strategically timed. You can lock webinars, exclusive tutorials, detailed case studies, advanced training, or anything your audience would feel they’re missing. The gate creates just enough friction to separate casual browsers from people with real interest. And those are the quality leads you want in your pipeline.
What you can configure:
- Display at (timestamp)
- Allow skipping (when you want to make the opt-in optional)
- Headline, placeholder, button, and bottom text
- Background, button, and text Color
- Integrate provider (FluentCRM, Mailchimp)
- Configure the CRM contact list to send the lead to
- Skip for CRM contacts (if CRM is integrated)
- Round corners
The integration piece is what makes this truly powerful. FluentCRM users can assign specific lists and tags directly from the video’s email layer settings. This way, a lead captured from a product demo video automatically gets tagged differently than someone who opted in during a beginner tutorial. This helps you send relevant follow-up emails from the very first message, ultimately turning leads into customers.
A quick note on psychology: the gate works best when viewers have already received enough value to want more. Gate too early, and they’ll bounce. Gate after you’ve delivered a genuine breakthrough moment, and submitting their email feels like a fair trade.
Embed forms (using Fluent Forms)
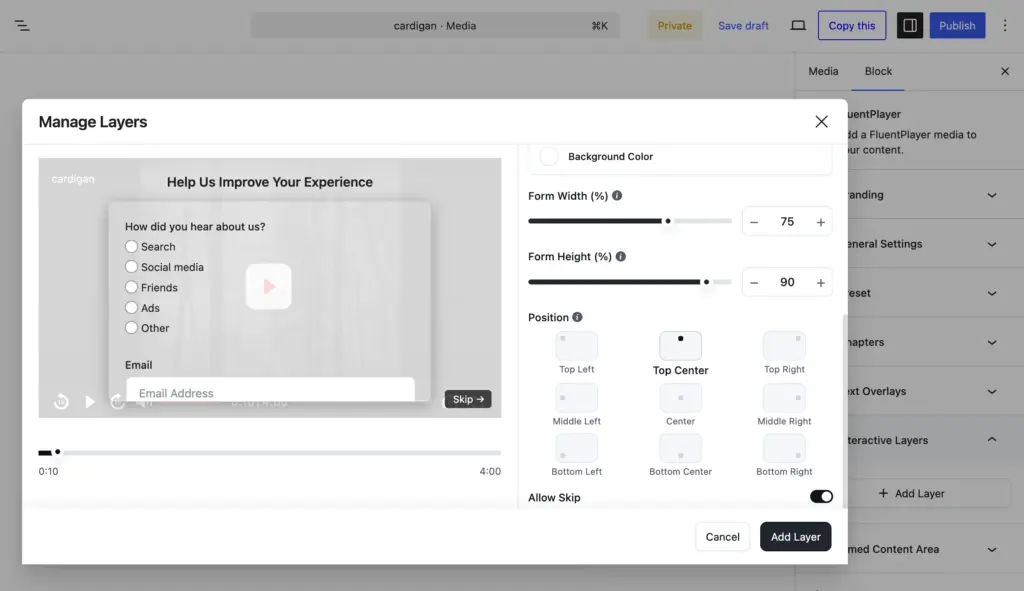
Embedding forms is a step beyond a simple email gate. FluentPlayer’s Forms layer lets you embed an entire form (using Fluent Forms) directly into the video, at the exact timestamp you set. With this, you can collect leads, run quick surveys, accept registrations, and even process payments, right from your videos.
Moreover, all Fluent Forms features apply to the video embeds, including conditional logic, multi-step layouts, file uploads, calculations, quizzes, payment fields, and all the integrations. The engaging form features elevate your video lead generation capabilities even further.
Available settings:
- Start time
- Title
- Select form (any Fluent Forms’ form)
- Background color
- Width, height, and position
- Allow skip
Place hotspots (clickable attention markers)
Hotspots are animated, clickable circles that pop up on the video at set timestamps and stay visible for a set duration. They catch the eye without being intrusive. When a viewer hovers over it, they get a tooltip (an idea as to what might happen if they click it). Each hotspot links to a URL, which could be a product page, a sign-up form, a free trial, or any destination you choose.
This is more subtle than a gate or a full-screen CTA, and that’s the point. Hotspots work best when you want to offer an action without interrupting the viewing experience.
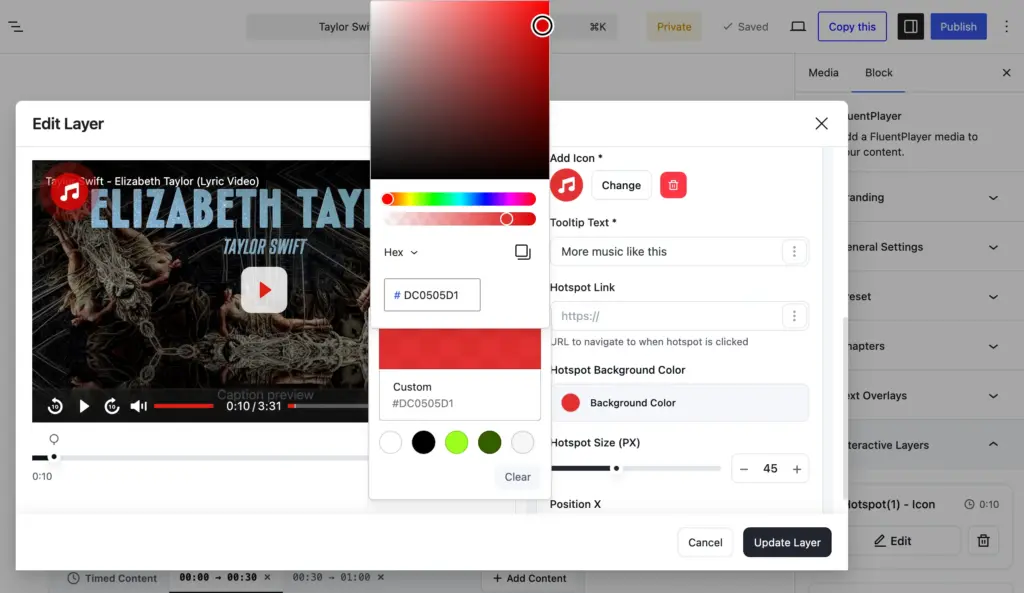
What you can configure:
- Timestamp and duration
- Pause-on-hover behavior
- Tooltip text
- Destination URL
- Icon, color, size, and position
The classic use case is product demos. You’re walking users through a feature, explaining how it works, and right as you’re showing it on screen, a small hotspot appears linking to a free trial page. It’s contextual and catches people at the exact moment they’re thinking “I want to try this.”
Hotspots also work beautifully for e-commerce. When you’re walking through a product in a review video, place hotspots on individual items, linking them straight to their purchase pages. This takes the friction away from the user journey for those who want to buy the product.
Insert your own video ads
The Ad layer lets you run in-video ads at specific timestamps. With it, your promotions remain entirely under your control, with no third-party ad network or algorithm involved.
The real value here isn’t about running ads in the traditional sense. It’s about self-promotion done right. For example, course creators can promote a related paid course inside a free lesson, or tech companies can showcase a premium feature upgrade at the perfect moment during an onboarding video.
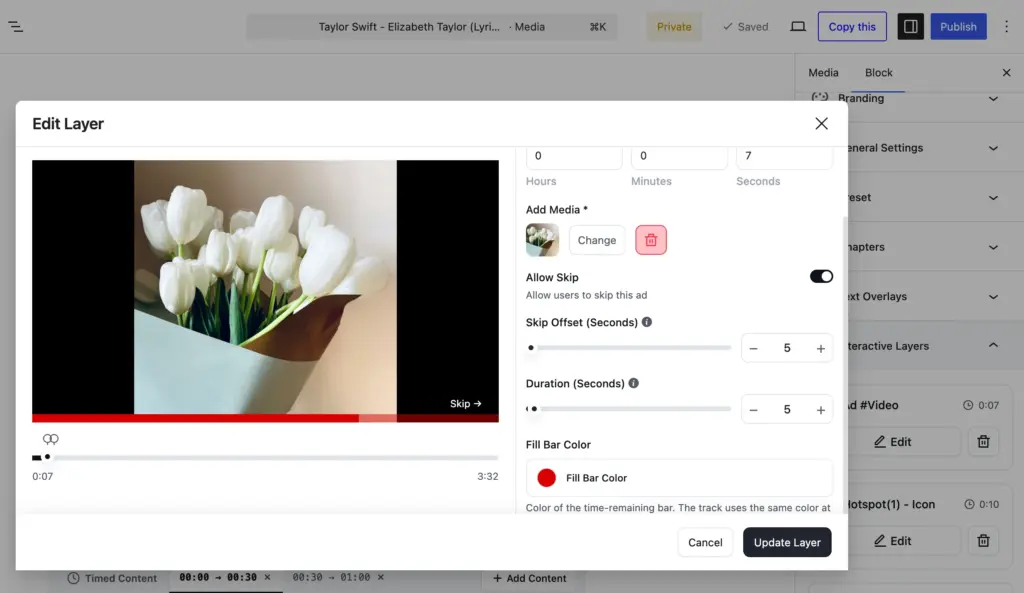
Ad layers allow you to configure:
- Start time
- Allow skip
- Set a minimum time to skip the ad
- Duration after which the layer will hide (for image ads)
- Custom media (the ad) upload
- Time-remaining bar color
Embed any WordPress shortcode as a layer
This is FluentPlayer’s most flexible layer. It takes any WordPress shortcode and turns it into an interactive layer. Booking calendars, custom widgets, third-party form tools, calculators, or any dynamic content blocks can appear inside your video if they have a shortcode.
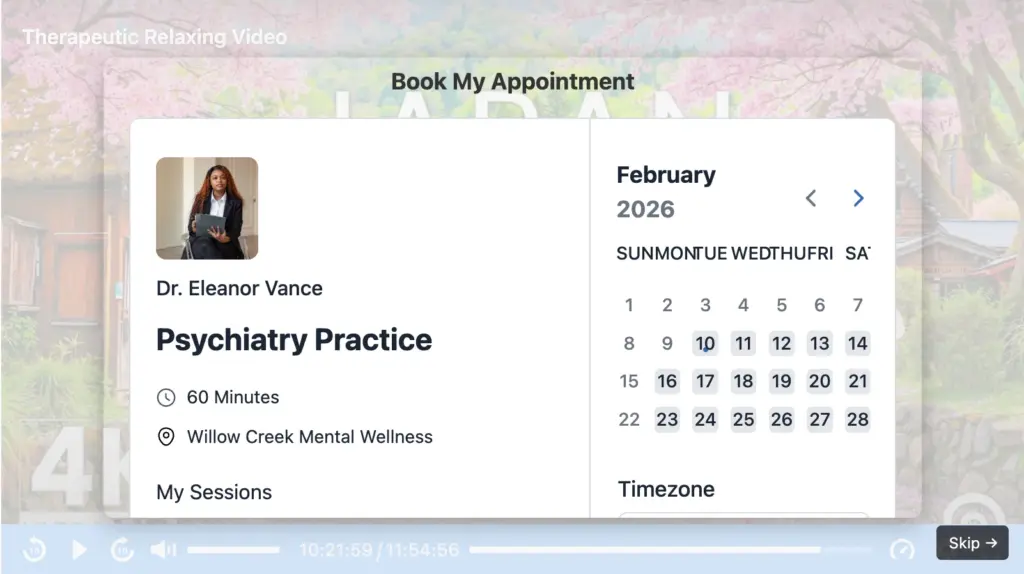
What you can configure:
- Start time
- Title
- Shortcode input field
- Width percentage
- Background color
- Auto-generated skip button
The shortcode layer is responsive, so you don’t have to worry about whether the plugins integrate natively or work well together. Thoughtful shortcode embeds at the right moment can effortlessly maximize your lead generation.
Now that you’re acquainted with the interactive layers and know how effectively they can generate leads, let’s see step by step how you can start your lead collection journey today.
Setting-up your first lead-capturing video
Here, I’ll walk you through how to create a fully functioning lead-capture video on your WordPress site using FluentPlayer, the next-generation video player plugin.
Step 1: Install FluentPlayer
Install and activate the plugin from your WordPress dashboard. Connect your license key, and you’re ready to go.
Step 2: Add your video
Navigate to your FluentPlayer media list and add new media. You can pull from YouTube, Vimeo, or Bunny Stream (both CDN and Storage options) or insert from your media library.
Step 3: Customize the player
Before you add interactive layers, take a few minutes to set up the basics. Add your brand logo and colors, choose a player preset that matches your site’s aesthetic, and break the video (for long videos) into chapters so viewers can navigate easily.
These details improve the viewing experience before anyone encounters an interactive element, which means more people actually reach your capture points. Moreover, a polished video player signals professionalism and earns trust.
Step 4: Choose your layers
FluentPlayer gives you six layer types: Email Capture, Forms, CTA, Hotspot, Ad, and Shortcode. You don’t need to use all of them. In fact, you should start with one or two and then expand based on the results.
A good starting setup: Add an Email Capture gate after providing initial value and a CTA layer near the end. The CTA layer should point to whatever logical next step makes sense (a landing page, a booking link, a related resource). This is a proven approach to start generating leads without overwhelming the viewer.
Step 5: Configure your layers
For email capture layers, connect to your email marketing provider. If you’re using FluentCRM, assign a specific list and tags based on the video. This will keep your follow-up sequences genuinely relevant. If you’re using Fluent Forms, embed the form directly. For any other form tool, use the Shortcode layer.
Best practices of video lead generation
Getting the configurations right is step one. These tips will help you actually convert viewers into leads.
Keep forms short: Name and email are the sweet spot. Every additional field drops conversion. If you need more data, collect it post-signup.
Trigger after value delivery: Don’t gate a video at the beginning. Viewers haven’t seen enough to care yet. Trigger after they’ve experienced real value and want more.
Use a value-driven CTA: “Get my free checklist” converts better than “Subscribe.” Be specific about what they’re getting, and make the offer sound personal. A good rule is to let your CTA finish the sentence “I want to.”
Offer a lead magnet: A template, guide, or bonus resource tied to the video gives viewers a concrete reason to opt in. Match it to the video topic.
Test timing and placement: Try the same opt-in at a timestamps for a month and at another the next. Compare the results and optimize. Small changes in trigger timing can have a big impact on conversion rates.
Optimize for mobile: More than half of your viewers are on mobile (depending on industry). Test every interactive layer on a phone before publishing.
Add social proof near the video: A testimonial or subscriber count near the embed creates trust and reassures new visitors before they hit the opt-in.
Add captions: A significant portion of people watch videos on mute. Captions keep them engaged long enough to hit your trigger point.
Place video above the fold: The higher the video, the more views it gets. More views mean more lead capture opportunities.
Start small, pick two or three best practices that seem easy to apply. Test if you’re getting better results. The optimizations are small, shorter form, better timing, stronger CTA, but combined, they make the viewer experience smooth. And a guided experience always drives more engagement and conversion.
Start capturing leads from your videos
A video without a capture strategy is just entertainment. When you add the right trigger, an email gate, an embedded form, and a well-timed CTA, your video becomes an automated lead generation tool.
FluentPlayer gives you all six interactive layer types to do this inside WordPress without any custom development. You control the timing, the message, the tool, the style, and the follow-up.
Start with one video. Pick one layer type. Watch the result and optimize.
Ready to try it? Download FluentPlayer for free
